Showing posts with label and. Show all posts

Monday, March 3, 2014

Support WWMM and earn cool perks!

0 comments
I am excited to announce a project Ive been working on for a few weeks now and I hope you will consider participating. Please watch the video below which will explain more. (Dont worry, I have a regular woodworking video tomorrow!)

Woodworking for Mere Mortals is the most time-consuming full-time job Ive ever had.  I love every minute of it and wouldnt trade my work for anything. The only part I dont particularly enjoy is spending a lot of time marketing in order to generate the ad revenue that keeps me in business. Unfortunately, the advertisements tend to become a barrier between me and the people who support WWMM the most.  My goal is to keep producing fun woodworking projects with less dependence on advertisers.

Click to get involved!

This is where Subbable comes in. It is brand new and something of an experiment at this point. Its vision is to provide a platform wherein viewers can directly support their favorite shows and earn perks in the process.

Most importantly, please understand that I will never to charge for my videos. I believe that allowing free access to woodworking info will pay itself back in future generations. If you arent in a position to support WWMM financially, I am completely cool with that.

But if you have enjoyed my show over the years and would like to help out, please consider a voluntary subscription. You can subscribe with any amount you feel WWMM is worth. Now heres the neat part: every dollar you spend goes into your "Perk Bank". You can save your perks and redeem them at various levels for all sorts of stuff available only to subscribers!

Please consider getting involved and learn more on my Subbable project page. 


Read More..

Monday, February 24, 2014

BACON AND POTATOES pantry unit

0 comments

George and I had a nice long weekend, this Victoria Day holiday.
We were able to get away on a couple day trips that we enjoyed.
I did a little painting, got some deliveries done, finished unpacking from the Mothers day Sale,
re-arranged an entire room that I will share with you soon,
and got these photos taken of a new pantry unit I did.


I always have a ton of ideas running through my head and this unit was
pulled out to try another. However that went south when I realized the measurements
of the unit fit the needs one of my customers has for a kitchen piece.


The graphics used on this pantry unit were made from
a pair of old grocery store produce signs I found on line.


BEFORE  and AFTER
It started as a 70s maple china cabinet.
I altered the upper part quite a bit to provide the open shelving needed for dry goods storage.

This pantry unit was painted in ASCP Old White and waxed with Minwax Natural.
The interior is painted in a grey mixed from ASCP colors.
The graphics were handpainted with jet black acrylic paint.
The drawer handles and door pulls are reproduction glass.

I hope you like the outcome as much as I do!

Sharing with:

Miss Mustard Seeds Creative Blog

Read More..

TIME TO BREAK THE GLASS art frames and chalkboards

0 comments
 
Take a look at some beautiful frame sets


Frame set are meant to be art all on their own. They create drama thru color and texture.
**No glass was actually broken in the making** Hang them on the wall, lean them on a surface,
display your favorite things, Versatile and Beautiful. Collected over time most of these frames were
 emptied before I found them.


Read More..

Saturday, February 22, 2014

Sometimes you win sometimes you lose sometimes you gotta wait and see

0 comments
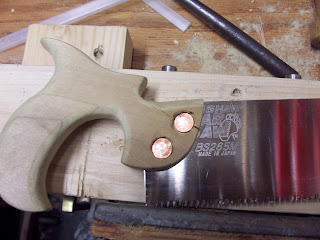
Well I finished the day with a saw sporting a nice wooden handle. . . Well see how long it lasts. . . but I learned quite a bit anyhow and if I have to replace it. . . well I wont be able to make it such a production the next time will I?
To start this post though, I did finish shaping the Disston "D" handle, complete with the little detail that makes the bottom of the handle look like its wrapping around and rejoining the wood. That being done, I decided to move forward on joining the sawblade to the open handle. First was taking the old handle off. Not difficult as the handle was designed to remove. Then I lined up and cut the end of it square. The saw will never fit on its old handle again, that begs the question of what can I do with the old handle???  maybe something will come to mind in the future... got any ideas feel free to comment them.

Used a pair of aviation snips to cut the blade square, then I filed the cut smooth. The black curved line is where I intended the handle to end up. I then clamped the new handle into the vice and using the thinnest kerf saw I own. cut through the head of the new handle to the right depth, about even with the flare on the top. (Youll understand when you see the pieces fit together further down) I then test fit the saw together. and here is where I made what may, or may not turn out to be the fatal flaw... (builds the suspense)
Damn the saw looked great, I could just about feel how well it was going to work, even better than the crap plastic handle that was there before. I was eager to join the pieces together, maybe too eager. I did not have any of the flat head, split nut bolts, that saws traditionally use, lying around. What I did have was some wide head copper rivets. I decided I would drill the holes in the handle and blade to accept the copper rivets and get the saw together tonight.

Now is where I should mention that I am not, by any stretch of the imagination, an expert in riveting. I have them for some leather working I have done and an antler hair comb I made once as an experiment. What I wasnt thinking of when I decided to use them was that the underside of the rivet heads have a slight cone shape to them... I can hear that some of you are already figuring out what happened.

I drilled the holes in the handle and the sawblade... I have to admit I abandoned the hand tool frenzy for this part. Relying instead on the trusty cordless drill and an 11/64th drill bit. I then used a 1/2inch forstner to recess the holes to allow the rivets to have room to peen over.

As I was peaning the end of the rivet around the burr, I was also driving the cone on the backside of the head into the wood, effectively driving a wedge into the grain, and causing it to split. Not a bunch and not completely, but enough to weaken the saw while it takes the pressure of cutting. If I did nothing to help, it wouldnt last long and I would be starting from square one again. Not that I might not anyhow, and learning what I have I wont make similar mistakes again,


But what to do this time around, again I had to dip into my not so period stash of tricks, modern wood glue would not be enough, not strong enough. But I always keep some JB Weld in the tool box. It works great for making jigs or repair, the stuff is damn near indestructible. I even used it to repair a crack in a radiator once. So I broke it out, pushed as much as I could get into the crack and placed a clap to seal the crack in place. Only time will tell how well it holds up, but I guess I felt like I had to give the repair a shot. Ill let it dry a day or so, then give it another test go and see if it will hold.

If not I really dont see how Im out much. I can make another handle, and Ill be able to be more careful about attaching the blade from here on. The awesome thing is both how the saw looks and how it handles compared to the handle it had before. So today being my last day off until Saturday. I will see how much I can accomplish but as always I will continue to update mywork here.
Read More..

Wednesday, February 19, 2014

Do it Yourself Woodworking Some Tips and Ideas to Start Your Own Woodworking Project

0 comments
Do it Yourself Woodworking
Do it yourself woodworking projects are fun activities that you can do at home and a good alternative to buying brand new furniture. It is also a good way to restore old furniture or make something new out of your furniture that has been stuck in your garage for long. It just takes a little creativity and you can do many projects by yourself.

Even if it is just your first time to do it on your own, you can however find some great resources that you will find useful in making your do it yourself woodworking project successful. You may however start with some simple projects to make it easier to complete. However, here are some tips that you might also find useful in your woodworking project.

-Your choice of wood. One of the things that you may need to decide when starting on a woodworking project is the wood to use. You can choose either softwood or hardwood in your projects or any kind of species depending also of the project you are making. Most often, hardwoods are used for indoor projects like cabinets or furniture and softwood are often for outdoor projects. In fact, softwoods are even used as lumber in most construction projects as they are easy for construction especially when you are using woodworking tools. If you are just starting, it may be wise to start with softwoods to make your project a little easier for you.

- Sanding your wood is also important as this creates a smooth finish to your woodworking project, makes your project durable from wear and tear, and of course allows your painted project to be long-lasting. One of the most important tips in sanding your wood is to go with the grain.  Going against it will create marks on your wood and may not look good with the finish or the paint. Also start with the coarse-grit sandpaper down to the finer ones.

- In choosing your woodworking finish, make sure you are using something that fits your do it yourself woodworking project. There are different choices of finish and each of them have distinct properties - oil, varnish, urethane, wax, shellac, lacquers, make sure you know what is best for your project. If you want a tint of orange to your finish product, shellac may be a good choice to enhance the appearance of dark-colored woods. If you are doing an outdoor project, varnish may be suitable for you as this finish is resistant to moisture and solvent and also protects the wood from scratches.

One great tip if you are just starting out with a do it yourself woodworking project is to start with something that you are comfortable working, and from there, you can learn more tips and techniques in your woodworking. It is also important to be extra careful in working with your tools especially in working with your lathes, and make sure you got good quality tools especially if you are looking forward to more woodworking projects in the future.

Read More..

Monday, February 10, 2014

Big Sur and Long Weekend

0 comments

Were starting our long weekend heading up to Big Sur and Monterey ... follow my on instagram to see what we find :) @sarahmdorseydesigns

Hope you have something fun planned! :)


Read More..

Fence Post Planter and Our Patio

0 comments
A few months ago David built a planter for our patio out of 6 redwood fence posts

Since spring is here, I thought I would share it with you today


Our patio does have a southern exposure which equals lots of light all day, but the front of our balcony has concrete instead of railing so that section gets indirect light most of the day, so a shade plant is needed.

Yesterday, I planted impatiens in our planter


I am hoping that they will look something like this soon ...


 Also recently planted, English Daisies - which love shade.


 My favorite is the lavender because it is drought/heat resistant and always looks great


Some herbs ready to be planted that I purchased when they were on sale


spearmint, cilantro, basil, peppermint, and rosemary 

These will be going in a new planter - the plan is for a ladder planter against this wall which gets mid morning to late afternoon sun (photo was taken shortly before sunset)


We have already purchased fence posts, maybe we will make it this weekend?

You can see our little lemon tree in the corner, only tiny green lemons right now ...

I would also like to add some hanging baskets on the beam, since they would get loads of sunlight.

Also, if you havent heard me mention it we are currently living at the beach, since I have never lived remotely close the the beach ... I am pretty excited about it


The photo was taken from our patio, while it doesnt capture the full immenseness of the view you kinda get the idea ... on the far left are the Oceano dunes (where part of Pirates of the Caribbean was filmed) and Pismo Beach is on the right

On a side note, I am tired of smelling people barbeque around dinner time, so we are getting a grill this weekend :) 

So many projects to do ... what will we do this weekend? planter, swap overhead light in bedroom, two mirrors to repair and paint, and finish other half of console table

Check back to see what we get done

Hope you have a great weekend!
Read More..

Abrasive paper and double side tape together for flattening

0 comments
The abrasive paper attached to a plan surface is a good way to flatten soles of metal planes for significantly improving their performances. Usually I use spray glue that allows a valid bur reversible bonding so you can easily replace the abrasive when it is exhausted. The only drawback is the glue residue left on the glass plate that has to be cleaned with alcohol every time . An alternative way is to use double-sided adhesive tape which provides excellent grip and when removed leaves no residue on glass and results in faster replacement operations .
If you cant find a full sheet of sandpaper wide enough then you could join two narrow strips togheter.
. The tape thickness is minimal and does not affect the flatness degree useful to obtain a good levelled surface.
Read More..

My New Rock And Roll Saw

0 comments
My next major project is a new combo tool cabinet come bench. I have everything for it worked out on paper so I am now in "collection" mode; finding the materials and specialty tools needed to get the thing built.

I posted about this design back in June of last year and Im mentioning this now because the design is in the Campaign style and I wanted you all to know that I was working with this style long before Chris Schwarz started his campaign build. 

The design calls for drawers and lots of them, all installed in multiple carcass cases that will make up two storage units each made up from stacking three carcass cases on top of each other. The bottom case for each will be 11" high, one for a saw till and the other for other high items, and the remaining two cases in each will be 7" high each with its own unique number of drawers. With them stacked on the base stand and the bench top placed across them, Ill end up with a bench at proper height. The reason for this type of design is its versatility. I can stack them as explained for a workbench, or I can do away with one of the bases and stack them all together on one base. The design will also allow me to change the stacking order to best suit my work habits, or to suit my mood, whichever the case may be.

As each pair of drawers in the individual cases will require a divider, and I cant think of a better joint to use for them than a sliding dovetail. I love this joint as it is strong and seeing a dovetail on the end of a wide piece is just downright cool. I made them all the time when I worked with a table saw, but not so much now that Im a tool pusher. They are both complicated and a hell of a lot of work to make by hand. The blind variety are also a royal pain in the butt to make. With that in mind, I have been working with Matt Cianci over on The Saw Blog on coming up with a new saw design, one specifically designed for cutting the two sides of all the blind sliding dovetails this project calls for.


While sliding dovetail saws are not something new, our design does have a few unusual features.

One of the biggest problems with cutting a blind sliding dovetail across a carcass wall is that the toe of the saw always digs in and makes a royal mess of things. Doing some experimenting, I came up with the idea that if the saws plate was arched, the digging in problem could be overcome. By giving an 11" long plate a 58" radius, it ends up arching up ¼-inch front and rear. Using the centre section to cut across the wider width of a carcass, the toe will not be able to bury itself during the cut. If the cut is blind, tilting down the heel of the saw as you go deeper will keep it from nose-diving and when the majority of the cut is done in this manner, you can tilt the heel up and use the toe to finish it off blind.

As the two cuts need to be equal in depth, I figured a depth gauge would be just the ticket so I came up with a design for a curved one to match the curvature of the blades arch. I then took a page from the old filletster planes and came up with an adjustable setup. I think the design will allow me to cut pretty accurate depths whether cutting across the board, or tilted up while cutting the blind with the toe. I designed the gauge to also work as a fence, planning to have it run up against the cleat instead of the blade. I just think this will be easier to work as there will be some distance between my hand and the cleat, keeping the skin on my knuckles in the process, not to mention saving the saws set for another day.

Matt was a lot of help to me coming up with the handles "hang", or angle of attack. At first I had it set to 34º, but Matt suggested it would be too difficult to work and suggested I bring it down to 24º, which is still higher than a normal handle hang. We did agree on the placement, though, as bringing it forward so the grip is over the heel of the saw will help to keep it against the cleat.

Wanting the thing to look good as well, I decided on making the body out of zebra wood and the handle and horn out of ebony. I think these two woods work well together with their strong contrast in tones.

The result of all of this is that Matt is now looking for an old piece of .028" plate stock and Im sourcing out a place to buy a hunk of ebony that wont cost me more than what I paid for my last new car.

The project should be fun to put together, but with a total cost probably in the $250 to $300 range, I sure hope the damned thing works.

Peace,

Mitchell
Read More..

Monday, February 3, 2014

Guide 6000+ personal woodworking plans and projects pdf

0 comments

Useful 6000+ personal woodworking plans and projects pdf must try

6000+ Personal Woodworking Plans And Projects Pdf

Router wood projects – how to build diy woodworking, Router wood projects – step by step diy woodworking blueprints pdf download how to build a router wood projects with quality plans. router wood projects. The perfect diy wedding | a blog for brides and grooms who, A blog for brides and grooms who choose diy for the personal touch to their wedding celebration (by amelied). U-m personal world wide web server - university of michigan, You have reached the personal homepage server for the university of michigan. um gateway the um gateway, http://www.umich.edu/, is an entry point to networked.

Olympia - ohs: welcome, 1302 north street olympia, wa 98501 (360) 596-7000 attendance: (360) 596-7003. Floor plan - university of michigan, Assignment 3 floor plan cad fundamentals i due february 1 architecture 411 objective to learn to draft precise architectural plan drawings. to gain experience with. Ana white | free and easy diy furniture plans to save you, Please read through the entire plan and all comments before beginning this project. it is also advisable to review the getting started section..

Unit 6: personal and professional development in health, Edexcel btec level 3 nationals specification in health and social care – issue 1 – june 2010 © edexcel limited 2010 1 unit 6: personal and professional. Wood conservation - conservation manual - conservation, As an organic material, wood normally decays under combined biological and chemical degradation when buried in earth; it may, however, survive prolonged exposure to. Consolidated community funding pool - fairfax county, virginia, Consolidated community funding pool. the consolidated community funding pool (ccfp) funds projects that provide for: human services affordable housing.


Try 6000+ personal woodworking plans and projects pdf


6000+ personal woodworking plans and projects pdf
,

9 out of 10 based on 12 ratings
Read More..