Showing posts with label work. Show all posts
Showing posts with label work. Show all posts
Thursday, February 20, 2014
Blue House bowl initial work
Hi Everyone,
Ive heard back from the Blue House folks and we will definitely be raffling off the bowl so Im going to begin posting pictures and comments about the bowl. I will post an announcement on this blog and on Facebook when the tickets are ready for purchase.
Here we go. Here are several opening photos of the block of wood:

This is a solid block of white ash. Its a lovely wood to turn. Now this particular block was processed whilst in its "green" state, meaning that it was not dried after it was cut. So to keep it from drying out and cracking, the block was coated with wax and shipped to me earlier this week. Here Ive marked out the center and Im going to attach a faceplate to what will eventually be the front of the bowl:

This is a sizable, heavy block of wood and so it is going to take some precautions to turn it safely. Im going to use big, long wood screws to hold it to the faceplate and Im also going to place it "between centers" which means Im going to use the live and dead centers of the lathe to mount it:


Now it can be turned without a lot vibration and that means it can be turned safely.
Here is the blank after several minutes of turning. Im making the underside of the bowl first.

...and here is the blank after about 15 minutes of turning. You can see that there are both sapwood and heartwood in this blank.


The next posting will describe how the bowl is attached to the lathe and hollowed out.
VW
Read More..
Ive heard back from the Blue House folks and we will definitely be raffling off the bowl so Im going to begin posting pictures and comments about the bowl. I will post an announcement on this blog and on Facebook when the tickets are ready for purchase.
Here we go. Here are several opening photos of the block of wood:
This is a solid block of white ash. Its a lovely wood to turn. Now this particular block was processed whilst in its "green" state, meaning that it was not dried after it was cut. So to keep it from drying out and cracking, the block was coated with wax and shipped to me earlier this week. Here Ive marked out the center and Im going to attach a faceplate to what will eventually be the front of the bowl:
This is a sizable, heavy block of wood and so it is going to take some precautions to turn it safely. Im going to use big, long wood screws to hold it to the faceplate and Im also going to place it "between centers" which means Im going to use the live and dead centers of the lathe to mount it:
Now it can be turned without a lot vibration and that means it can be turned safely.
Here is the blank after several minutes of turning. Im making the underside of the bowl first.
...and here is the blank after about 15 minutes of turning. You can see that there are both sapwood and heartwood in this blank.
Here is a photo after about 45 minutes of turning. The underside of the bowl is turned. Since the bowl is lighter in weight now and it has been trued up, I can take away the dead center of the bowl and cut out a tenon, or special slot, so I can fit a special wood vice to the bottom and get it ready to be turned around for hollowing.
The next posting will describe how the bowl is attached to the lathe and hollowed out.
VW

Monday, February 17, 2014
The Wood Work Bench The Old But Effective Standard in Work Benches

What helped Leonardo da Vinci conceptualize and build machines at such an extraordinary rate? Well, he certainly doesnt have computers equipped with design software. Back in Leonardos days, inventors do it all manually. Certainly, Leonardo had books, drafting boards with parchment, straight edges, quills, and clay models to aid him in conceptualizing his designs. Chances are he also had tons of tools.
Get Into Very Valuable Digital Carpentry Plans
But how did he organize all of these?
Simple: with the help of a good old wood work bench.
Ancient Greek architects, medieval alchemists, Renaissance inventors like Leonardo da Vinci may have different set of tools to craft their work, but they all have the same wood bench where they organize their tools and do most of their work. With the advent of digital technology, most engineers and designers have disposed of the traditional work bench in favor of their computer-driven digital bench. Yet the wood work bench is still indispensable in most peoples working areas.
Why Get A Wood Work Bench?
Today, there are many materials that can be used to build work benches-steel, aluminum, melamine, synthetic wood-but a wood work bench is still the best thing for heavy-duty work. Work benches made of melamine and synthetic wood may be cheap and easy to carry around different work areas, but they cannot match the toughness and durability of wood work benches. Most steel and aluminum work benches are corrosion-proof and may handle all those hard poundings, but nothing can really compare to the aesthetic attributes of the traditional wood work bench.
Another great thing with having a wooden bench in your area is that it invokes a feel-good atmosphere. And that is really the most essential thing that you should have in a work area-a feel-good, serene aura that will allow you to focus on what you are doing.
Did You Build Your Own Chicken Coop?
Wood Materials
Solid hardwood is somewhat expensive, but it is the kind of wood that makes a good wooden bench. Typically, pine, maple, cherry, and mahogany make a good solid bench. Fir, oak, walnut, and beech are also used to create firm benches. But you can also build a wood bench with just one type of wood or you can make a work bench with different types of wood.
Size
The size of your bench would mainly depend on the work that you will do. If you will do carpentry or any other tasking work, then you will need to get a large, solid wood work bench with cabinets and shelves to organize your tools. Another thing to consider is the size of your working area. If you have a small workspace, then you may just opt to get a small or medium-sized wood work bench with lots of shelves and cabinets for easy storage of your tools.
Heres How You Can Build Your Sheds!
Monday, January 27, 2014
some fancy cnc work
Labels:
cnc,
fancy,
some,
work
0
comments
 a while back, we worked with our neighbor, steve holman, on two large conference tables, one 9 x 26 and one 8 x 20. we had to set them up in my garage as neither of our shops was large enough to hold them ... this fall he got a commissions to build two more smaller tables, a 16 footer and a 14 footer. those both fit in his shop and were simpler in design, but we still helped by cutting the table and base pieces on our cnc.
one of the other parts of this project was a fantastic reception desk, designed by steve and paul molinelli, that was full of curves and different levels and was pretty complex as you can see from the photo above. click the pictures to enlarge them ...

 so, how did we get from there to here ... it was easy for us. all we had to do was the full size templates, curved plates, and bending forms ... steve and his crew did the rest. im sure it could have been done without the cnc, but you would have needed some pretty big french curves to lay out the full size pieces. and then, the small adjustments ... it would have taken some time and some really intense bandsaw work ...
 we started by scanning the scale drawing actual size and then drawing over it in our cad program
 from there, trevor imported that into the cnc router program and he added the elevation sections shown above ...
 next step was the 1/4 scale model you saw in the photo at the top. trevor constructed it by stacking layers of mdf of the proper thickness to correspond with the section drawings at each slice.
 from there it was a simple matter for him scale it up to full size ... (increase; proportional) and then cut the full size patterns, counters to be veneered and their curved solid wood edges, and the plates from which steve and his crew created the curved walls and curved laminating forms.
 here are the walls, unskinned ...
 in some cases they were covered in wacky wood and veneer panels made with the curved forms, and in some cases, vertical siding of 5/8th" thick solid lumber
 next paul carved the car element (this project went to an automotive company) and added the hood element from, i think, a 1937 ford or chevy ... cool ...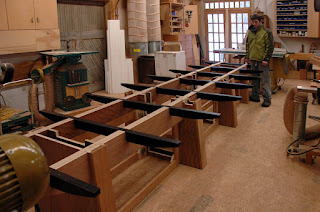
 and then there was the other part to the project; the two conference tables. one 14 long, and one 16 long ...
 this one is makore veneer and cherry. after i did the cad drawings, trevor programmed and cut the vertical elements of the base and the outriggers, the horizontal elements that receive the cross bars that support the top. he also cut the top sections to shape and the matching solid wood borders, as well as the holes for the power/data fixtures.
 this is a section of the walnut and walnut burl table. ditto for this one except for a little adjustment to the thickness of the inlay panels. for whatever reason, the pockets trevor cut in the top sections were a little too shallow (there were two sets of burl panels made as the first one was too dark and burly, so, i suspect that was part of the problem. anyway, it was a quick, though somewhat nerve racking fix. after milling pockets in the spoil board he took a few thousandths off the backs of the panels so that the 1/40th inch veneer panels were just a shade below the surface of the 16th" veneered main table panels ... im glad i wasnt the one to level them up ...
 but level them up they did ... and below, the solid wood edges are added to the top panels ...
 the tables are probably finished by now, and maybe well see them before they go, or maybe we wont. anyway, we always enjoy working with steve and his crew. their projects are inevitably a rewarding challenge.
Subscribe to:
Posts (Atom)
